
Continuing from last time, let’s see the Table tool. This time, I would like to do the data part and for the header, use the one you created last time.
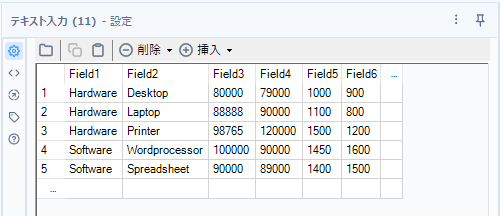
The Data that we handle this time
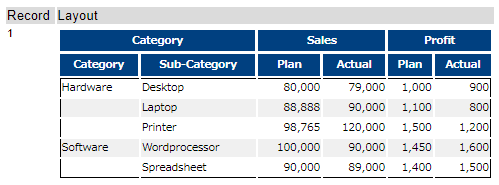
The data we want to handle is as follow.
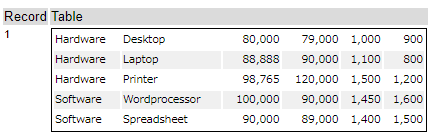
For example, if you put that data into the Table tool without “Show Column headings” option, you can see the table below.
When you see this table, you want to merge the most left column vertically. It means that it looks like the figure below.
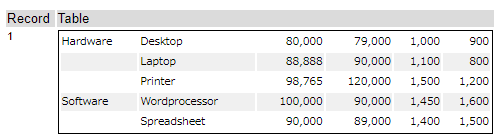
But strictly speaking, the most left column is not merged, this is a work around. So, if the same word comes, it is just erased.
How to erase the same word as the previous row
There are many ways to do that, so I’d like to explain four ways.
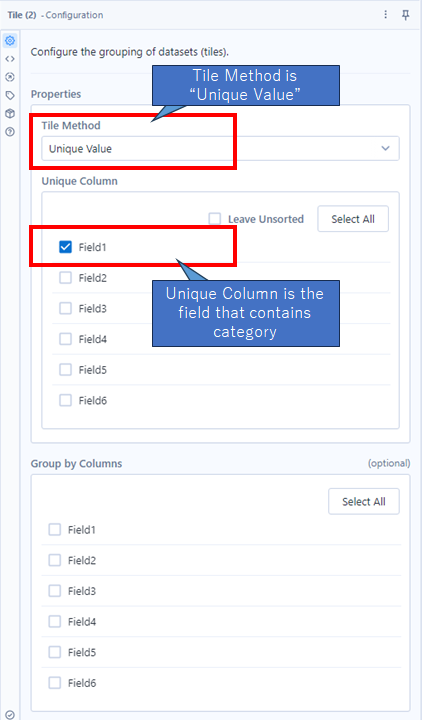
1. Use the Tile tool to keep only rows with Tile_SequenceNum 1 and erase the others
This way is very easy and cool. Use the Tile tool and if Tile Sequence Num is not 1, you just erase the category field value.
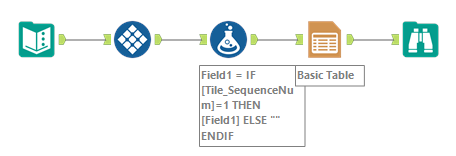
The Tile tool setting is as follows. Tile Method should be set to “Unique Value” and Unique Column should be set to “Field 1” which contains category field in this case.
An then, use the Formula tool. This is a very simple way because if Tile_SequenceNum field is 1, leave the category field’s value, if not, erase it. The actual formula is as follows.
IF [Tile_SequenceNum]=1 THEN [Field1] ELSE "" ENDIF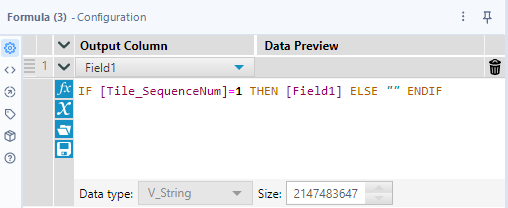
This is exactly no code!
2. Sort in reverse order and if the value is the same as the previous row, erase that
This way is using a simple formula. In order to use the simple formula, use the Sort tool. But when there are too many records, it will take more long time than other ways. However, I think this method has the advantage of simplifying the formula and making it difficult to make mistakes.
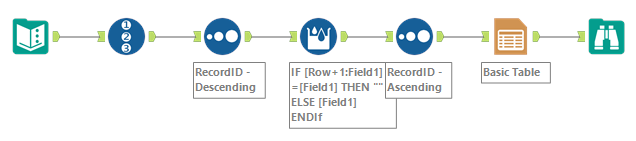
The way is follows.
- Add the Row ID by the Record ID tool in order to hold the row order.
- Sort the Record ID field in reverse order
- Erase the value in category field if the next row’s value is the same as current row.
- Sort the Record ID field in normal order
Generally speaking, sorting is heavy task, but the value of the sorting twice is to simplyfy the formula in the Multi-Row Formula tool. Actually, the formula is follows.
IF [Row+1:Field1]=[Field1] THEN "" ELSE [Field1] ENDIfThe formula above means as follows.
- If the value on the next record the same as the current value, erase it
- If not, leave it
The formula is very simple!
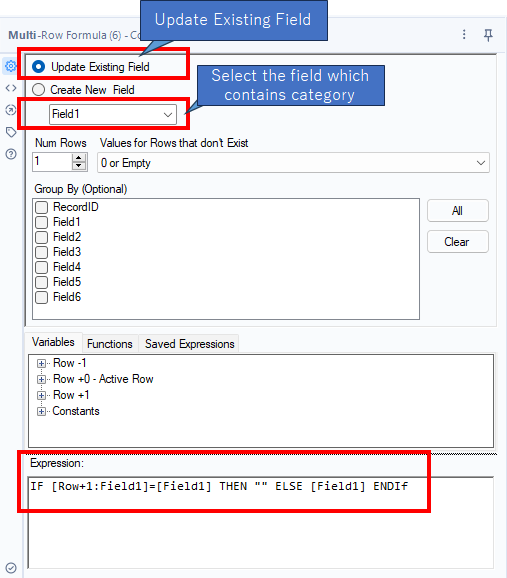
3. Add delete flag and erase the values later
Since directly deleting the values in the category row would complicate the formula, another method is to create a deletion flag column and erase it later according to the value.
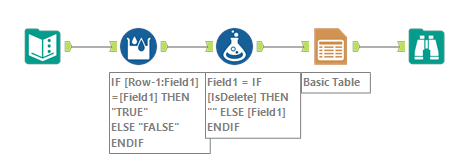
The expression as the Multi-Row Formula is not a kind of complicated.
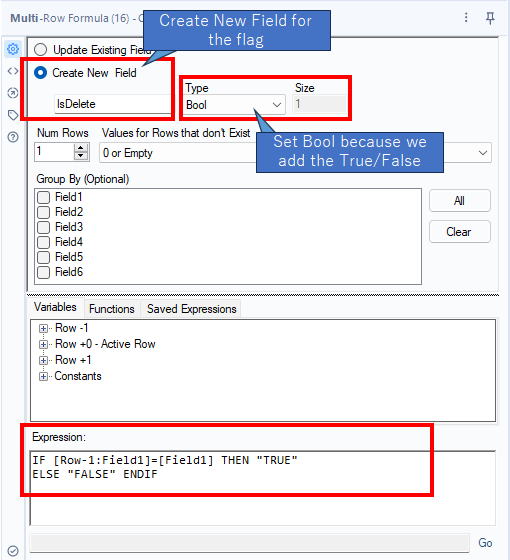
IF [Row-1:Field1]=[Field1] THEN "TRUE"
ELSE "FALSE" ENDIF- If the previous row’s value is the same of the current value, set “True”
- If not, set “False”
And then, you can just delete the category value if the flag field is false using the Formula tool.
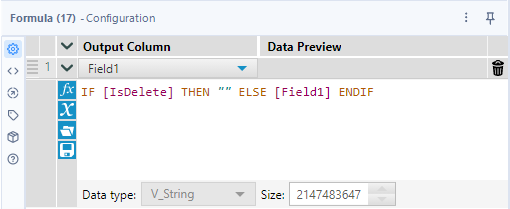
IF [IsDelete] THEN "" ELSE [Field1] ENDIFThat expression is very simple and there is no demerit.
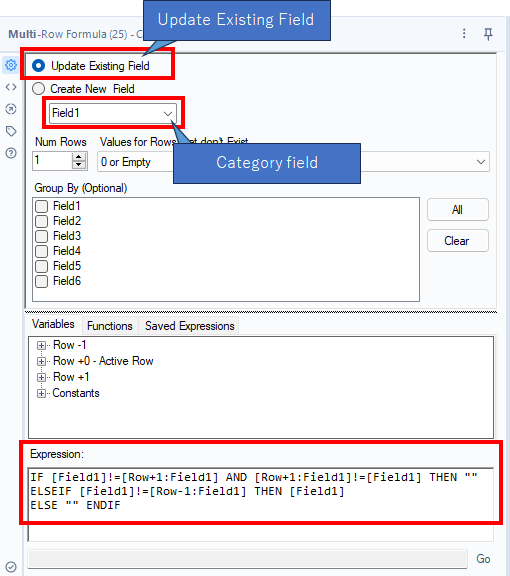
4. Use the Multi-Row Formula with the complex formula
This way is fewest tools, but the formula is complex. Although it looks elegant, it may not necessarily be the best solution if people are not familiar with Alteryx.
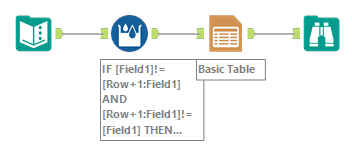
The expression is as follows.
IF [Field1]!=[Row+1:Field1] AND [Row+1:Field1]!=[Field1] THEN ""
ELSEIF [Field1]!=[Row-1:Field1] THEN [Field1]
ELSE "" ENDIF
It means…
- The previous row, current row and next row are not the same, erase the current row’s value
- If the current value and the previous value is the same, leave it
- If not, erase it
Multi-Row formula watches records from top to bottom, but you can only manipulate values in the current row at any given time, which makes things a little complex. In this case, if you erase the current row’s value, it becomes blank when you move to the next row, so you can’t use the logic of erasing if the current row and the row above are the same (because it is already blank). I think it can be quite troublesome to build a formula while taking this into consideration.
Combine data part and header part
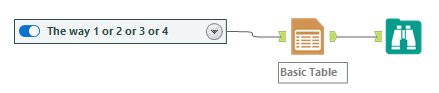
The data part can be created using any of methods 1 to 4 above.
Delete the unnecessary fields at the Table tool. That setting is as follows.
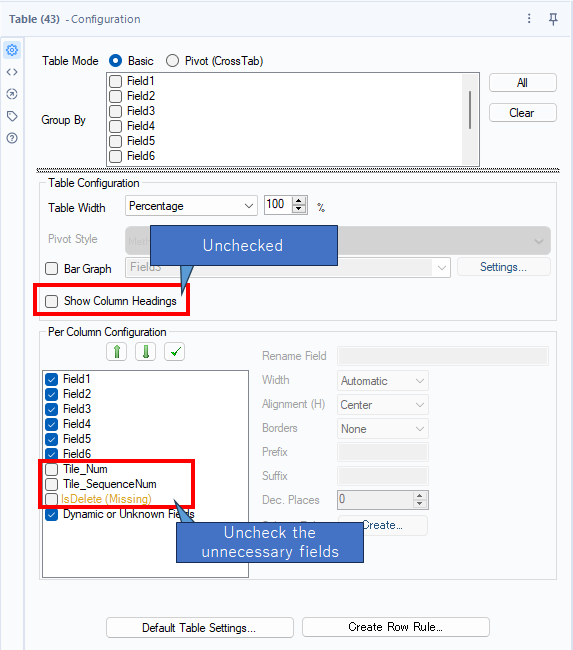
This shows the table below.
And let’s combine it to the header which you made at the Weekly Tips #23. Union those fields using the Union tool as follows.
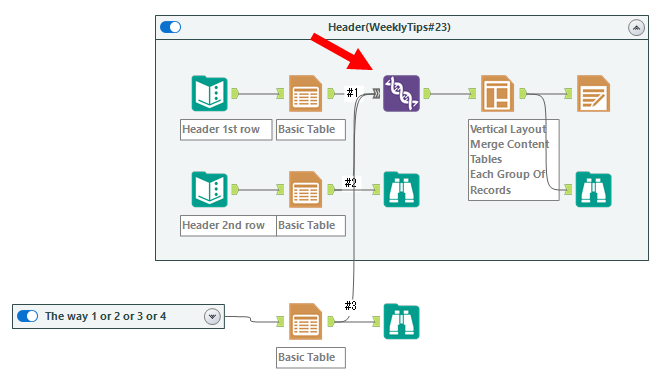
Of course, you need to adjust the order that the data part is the last order. This makes you the table below.
Sample workflow download
Next Blog post
I spent more time in the article than I expected on the logic of erasing to blank, so next time I’ll explain the width of the table.

コメント